

Tidying Up Your Tunes: How to Delete a Playlist on Spotify

So, the day has come: You’ve finally decided to declutter your Spotify music library. We all know the feeling – you create a playlist for every mood, every season, and every obscure musical genre you stumble upon. Your “Soothing Sunday Classics” playlist is sandwiched between “Workout Bangers” and “Guilty Pleasures.” It’s safe to say, your music library resembles a virtual labyrinth more than a well-organized collection.
In this guide, we’ll show you how to bid adieu to that playlist that seemed like a good idea at the time but now feels like the musical equivalent of a cluttered closet. Deleting a playlist on Spotify is a breeze, and we’ll walk you through it step-by-step. Let’s get ready to Marie Kondo your Spotify, one playlist at a time🎶✨
How to delete Spotify playlists on your phone
Here’s a simple eight-step guide to help you declutter your Spotify library on your mobile device.
Step 1. Open your Spotify app
Look for the famous green icon with three curved lines on your smartphone screen.
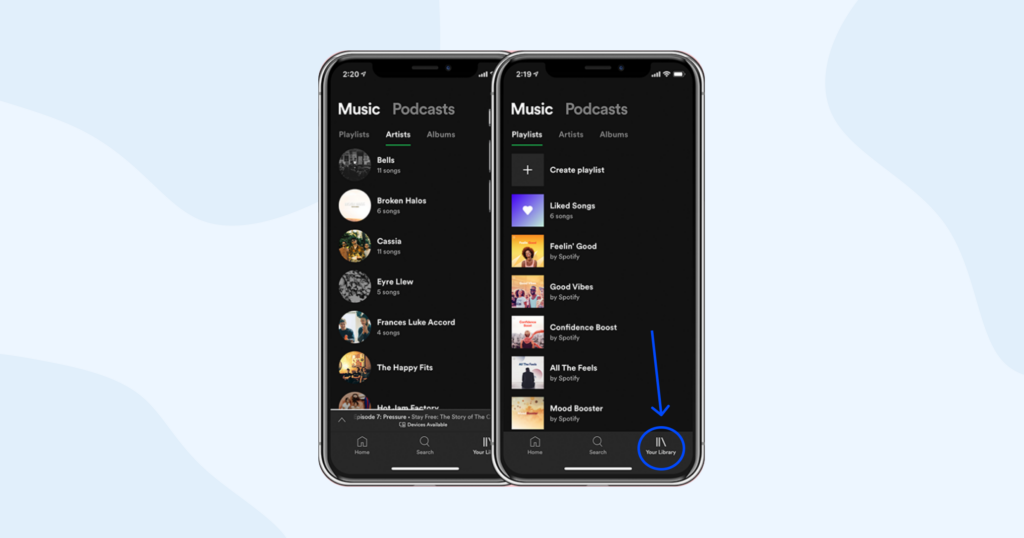
Step 2. Access your library
Navigate to the bottom of your screen and tap on the Your Library tab. It’s your gateway to the musical organization.
Step 3. Select playlists
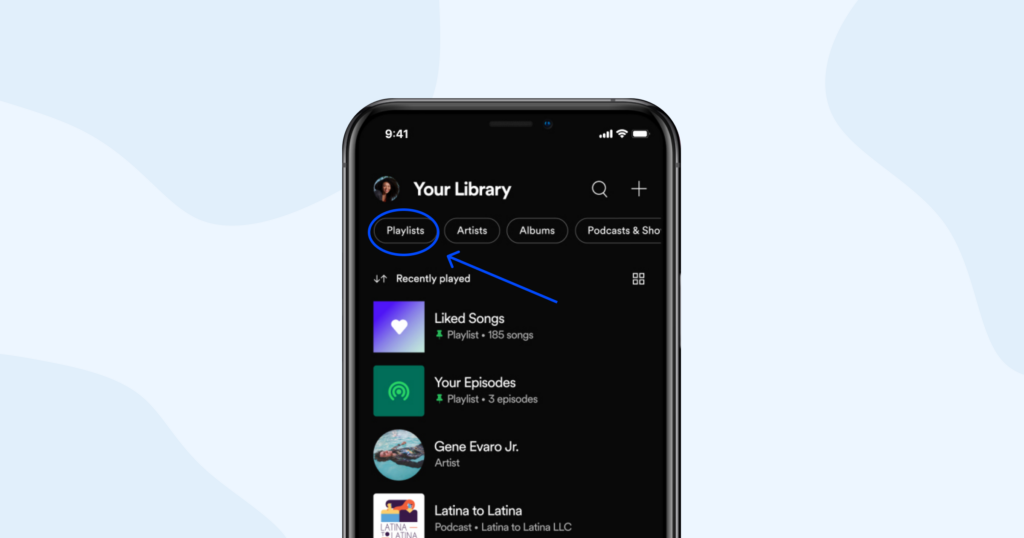
In the Your Library section, scroll through the options and find Playlists. Tap it.
Step 4. Find the chosen one
Locate the playlist you’re ready to part ways with.
Step 5. Tap the doomed playlist
No dramatic music necessary; just tap on the playlist you want to bid adieu to.
Step 6. Unleash the three dots
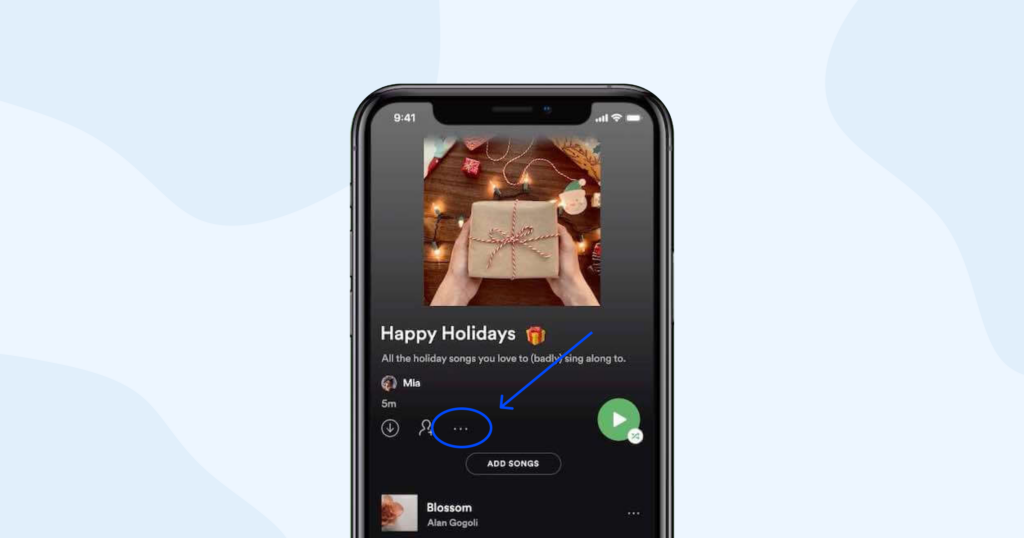
Look for those trusty three dots in the upper right corner – tap them!
Step 7. Delete Playlist option
Within the menu that unfolds, you’ll find the “Delete playlist” option.
Step 8. Confirm your decision
Spotify cares about your feelings, so they’ll ask if you’re sure about parting ways with your playlist. If you’re ready to let go, confidently tap “Delete” one more time. Congratulations, your playlist is now history!
Important Note: Spotify keeps your deleted playlist data for 90 days. So, if you ever experience playlist separation anxiety and want to reunite, there’s hope!
How to delete Spotify playlists on your computer
For those who prefer the expansive view of their desktop, here’s how you can effortlessly declutter your Spotify playlists.
Step 1. Launch Spotify on your computer
Whether you’re using the Spotify app or the web player, fire it up on your trusty desktop.
Step 2. Navigate to your library
On the left sidebar, you’ll see the “Your Library” tab. Click on it to reveal your musical collection. Alternatively, you can select a playlist directly from the left sidebar if you’ve got one in mind.
Step 3. Locate your chosen playlist
Once inside your library, find the playlist that’s on your hit list for deletion.
Step 4. Access the playlist options
Hover your cursor over the chosen playlist, and you’ll notice those familiar three dots – click on them. This will summon a handy menu.
Step 5. Delete the playlist
Among the menu options, you’ll spot the one we need: “Delete Playlist.” Click on it, and with just a few clicks, your playlist will be history. It’s as simple as that!
Now, whether you’re tidying up from your mobile device or computer, you’re well on your way to a harmoniously organized Spotify library.
How to unfollow Spotify playlists
We’ve already mastered the art of deleting our own playlists, but what about those playlists from others that are no longer striking the right chord? Well, that’s where the magic of unfollowing steps in. Unfollowing a playlist doesn’t make it vanish into thin air; it simply means it won’t clutter your personal space anymore. And remember, you can always rekindle your musical relationship by following it again if the mood strikes!
Step 1. Launch Spotify
Fire up your Spotify app to begin your unfollowing mission.
Step 2. Access your library
At the bottom of your screen, you’ll find the Your Library tab. Click on it.
Step 3. Explore your playlists
Under Your Library, select Playlists. Your ever-growing playlist collection awaits.
Step 4. Locate the playlist to unfollow
Now, it’s time to hunt down the playlist that’s ready to bid farewell to your library.
Step 5. Unfollow with a heartfelt tap
Open the playlist, and you’ll notice a heart icon. Give it a tap, and Spotify will confirm that the playlist is gracefully removed from your library.
With these simple steps, you can declutter your Spotify library, making room for the tunes that truly resonate with your musical soul.
Get access to a wider range of songs with HQ VPN
Here’s a little insider tip that not only broadens your musical horizons but also enhances your online security for a smoother Spotify experience. HQ VPN – your passport to a wider range of songs and a more secure digital world.
Expanding your musical universe
HQ VPN opens the door to a global library of music. With this virtual key, you can access songs, albums, and playlists that may not be available in your region. Say goodbye to those frustrating “Not Available in Your Country” messages and hello to a world of musical discovery. Whether it’s chart-toppers from other continents or hidden indie gems, your musical journey knows no bounds.
Enhancing your online security
But HQ VPN doesn’t just unlock musical treasures; it also safeguards your online presence. When you stream Spotify through a VPN, your internet connection becomes more secure, protecting your data from prying eyes and potential cyber threats. Your Spotify experience remains uninterrupted, while your personal information stays shielded.
So, as you explore the possibilities of your expanded Spotify library, remember that HQ VPN not only broadens your musical tastes but also keeps your digital world safe and sound. It’s the ultimate companion for a seamless and secure Spotify journey. Try it out for free and see for yourself!


