
How to Hide IP Address on iPhone: 5 Working Ways
Maintaining your online privacy has become a paramount concern in today’s digital landscape, especially with the growing prevalence of IP tracking and geolocation services. Businesses worldwide are leveraging these tools to tailor their content and services, but for many individuals, safeguarding their IP address has become a top priority.
If you’re an iPhone user looking to fortify your digital privacy, you’ve come to the right destination. In this article, we will review 5 effective and reliable methods to hide your IP address on your iPhone, ensuring that your online activities remain confidential and secure.
What’s an IP address and why should you hide it?
An IP address is a unique set of numbers assigned to your device when you connect to the internet. It acts as your device’s digital identifier, allowing it to communicate with other devices and websites online. Just like your home address, an IP address reveals your location and can be used to track your online activities.
Hiding your IP address is crucial to protect your online privacy and security. When your IP address is visible, websites, advertisers, and even hackers can trace your online actions, monitor your browsing habits, and potentially invade your digital privacy. By concealing your IP address, you can prevent others from knowing your real location and browsing history, ensuring a safer and more private internet experience.
What can someone do with your IP address?
The information revealed by your IP address may seem insignificant, but it can pose significant risks. Here’s the list of the most obvious things that someone can do with your IP address.
Obtain personal information
Your IP address can disclose your general location, revealing where you live or work. It allows others to track your online activity, such as the websites you visit and downloads you make.
Restrict access
Some websites or services may use your IP address to block access based on your location. For instance, if a site is blocked in your country, it can use your IP address to deny you access.
Steal your identity
Exposing your IP address could lead to identity theft or fraud, giving unauthorized individuals access to your personal information.
Use your personal information for illegal purposes
Hackers may misuse your IP address to carry out illegal actions, making it appear as if you are responsible for crimes you did not commit.
5 working ways to hide an IP address on an iPhone or Mac
There are multiple ways to hide your IP address on your iPhone and Mac. Let’s explore five working methods to safeguard your online privacy.
Safari’s “Hide IP Address” Option
In Safari’s settings on both iPhone and Mac, you can enable the “Hide IP Address” option. This feature routes your web traffic through Apple’s servers, masking your actual IP address from websites you visit. It is an easy and built-in solution to protect your IP address while browsing. However, it only works within Safari and may not be as effective against advanced tracking techniques used by some websites.
How to use it:
1. Open the Safari browser on your iPhone or Mac.
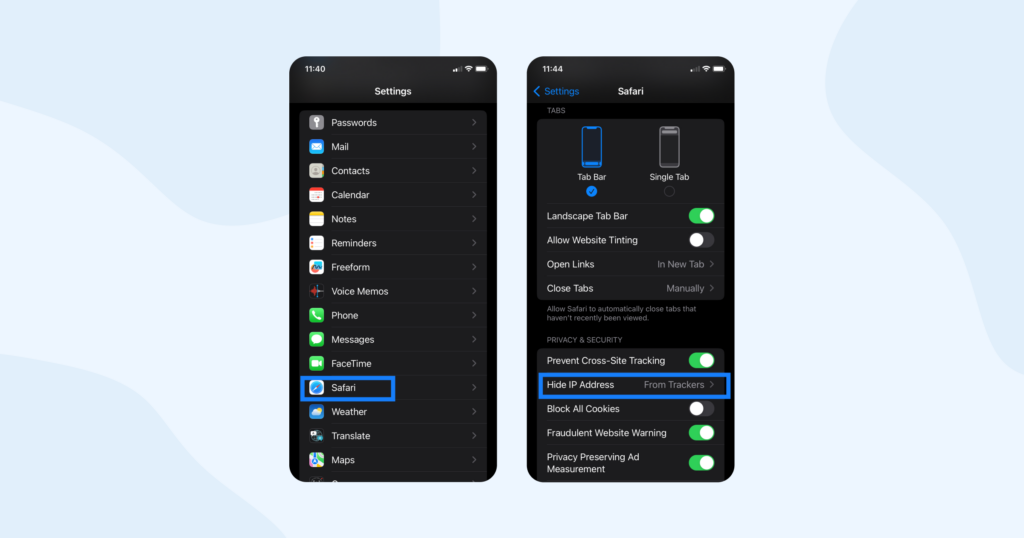
2. Scroll down to find the “Hide IP Address” option and toggle it on. Or simply make sure it’s on.
Once enabled, your web traffic will be routed through Apple’s servers, masking your IP address from websites you visit.
iCloud Private Relay
Available for devices running iOS 15 or later and macOS Monterey or later, iCloud Private Relay enhances privacy by encrypting your internet traffic and sending it through two separate relays, obscuring your IP address from websites. It provides stronger protection compared to Safari’s “Hide IP Address” option. However, it is only available for users with an iCloud+ subscription, which may involve an additional costю
How to use it:
1. Ensure your iPhone or Mac is running iOS 15 (or later) or macOS Monterey (or later).
2. Go to “Settings” on your device and on your Apple ID (it’s usually your name)
3. Select “iCloud” and then choose “Private Relay.”
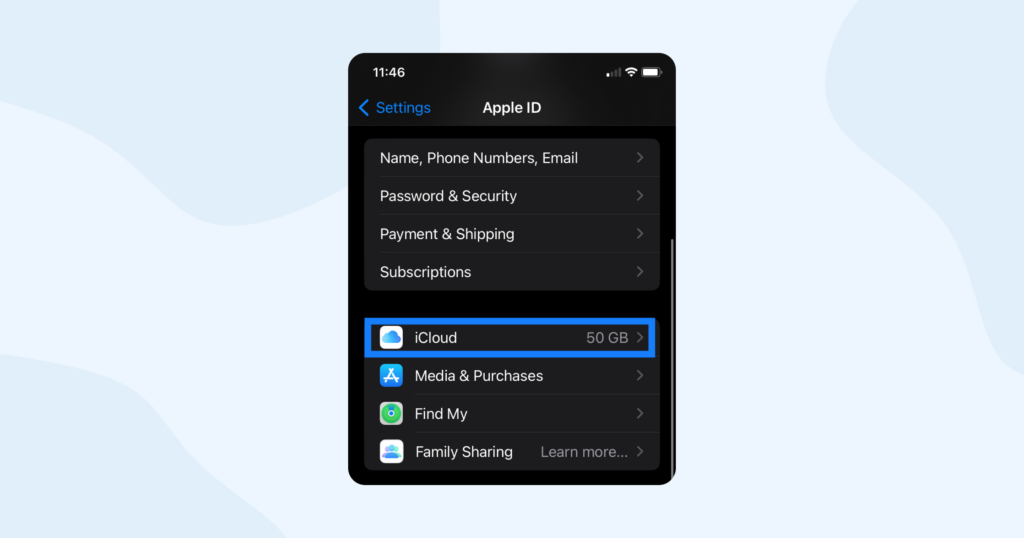
4. Toggle on the “Private Relay” switch to enable the feature.
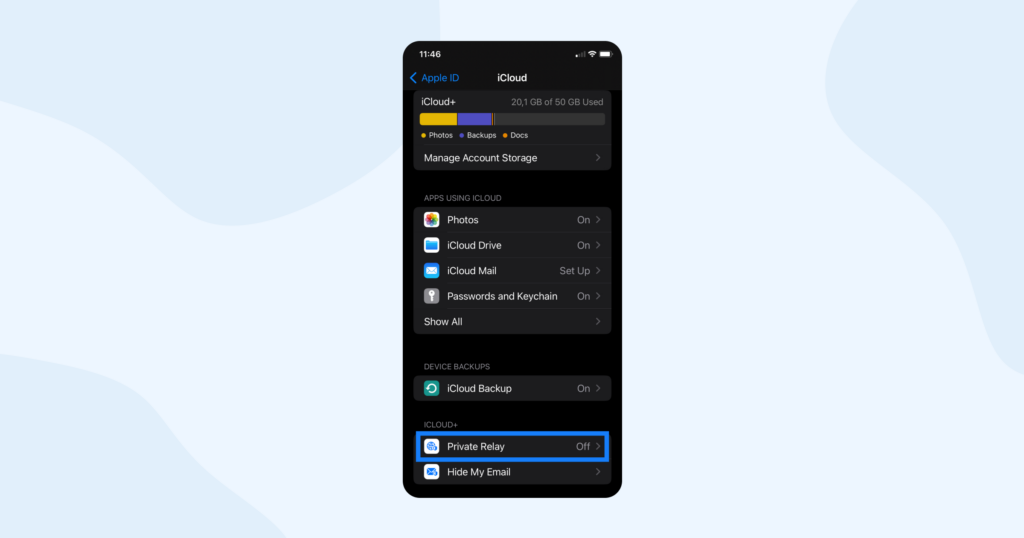
Your internet traffic will now be encrypted and routed through two separate relays, obscuring your IP address from websites.
Mail Privacy Protection Feature
For users with iOS 15 or later and macOS Monterey or later, the Mail Privacy Protection feature helps hide your IP address when you open emails. It prevents senders from knowing when and where they accessed their email, reducing email tracking and enhancing your overall online privacy. However, it does not hide your IP address from other internet activities.
How to use it:
1. Update your iPhone or Mac to iOS 15 (or later) or macOS Monterey (or later) to access this feature.
2. Open the “Mail” app on your device.
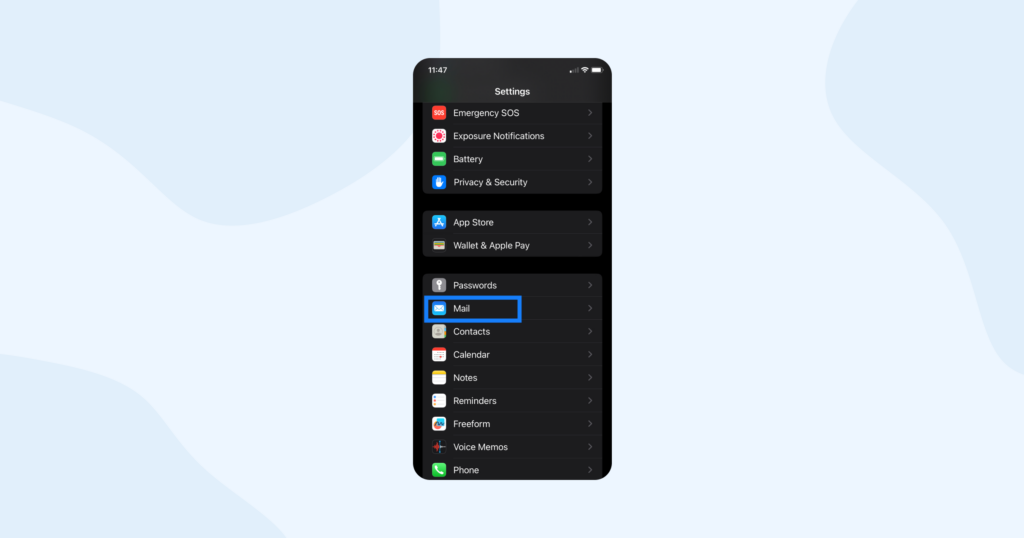
3. When prompted, enable the “Mail Privacy Protection” feature.
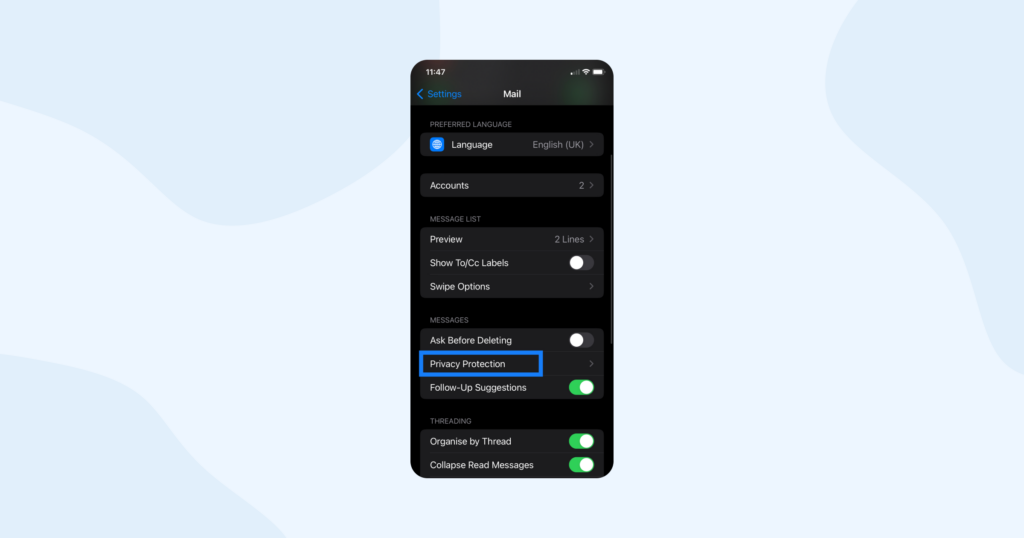
The Mail app will now prevent senders from knowing when and where you accessed their emails, hiding your IP address from email tracking attempts.
Using a Proxy Server
Configuring a proxy server on your iPhone or Mac allows you to reroute your internet traffic through a remote server. This server acts as an intermediary, making it appear as though your IP address is from the server’s location. Using a proxy server is an effective way to hide your IP address for all apps and services on your device. It adds an extra layer of anonymity and can bypass certain geographical restrictions. However, not all proxy servers are reliable, and some may log your data, compromising your privacy.
How to use it:
1. Choose a reputable proxy server service that meets your needs (e.g., anonymity, speed, location).
2. Obtain the necessary proxy server settings, including the server address and port number.
3. On your iPhone, go to “Settings,” then tap on “Wi-Fi.” For Mac, go to “System Preferences,” then click on “Network.”
4. Select your Wi-Fi network (iPhone) or the active network connection (Mac), and click on “Advanced.”
5. Under the “Proxies” tab, choose “Web Proxy (HTTP)” and enter the proxy server address and port number.
6. Optionally, you can configure “Secure Web Proxy (HTTPS)” and “FTP Proxy” with the same settings.
7. Click “OK” (Mac) or “Save” (iPhone) to apply the changes.
Your internet traffic will now be rerouted through the proxy server, concealing your IP address from websites and services.
Using VPN
Using a VPN service on your iPhone or Mac encrypts your internet connection and routes it through a server in a different region. This process effectively masks your IP address from websites and services.
VPNs offer comprehensive IP address protection for all apps and can provide enhanced security while browsing on public Wi-Fi networks.
However, the quality and privacy of VPN services can vary, and some free VPNs may log user data or display ads. Paid VPNs offer more features and greater security than a free VPN. So, it’s an investment in your online protection worth considering.
How to use it:
1. Subscribe to a reputable VPN service that suits your needs.
2. Download and install the VPN app on your iPhone or Mac from App Store or the VPN provider’s website.
3. Launch the app and log in using your credentials.
4. Select a VPN server from the list or just go with a recommended one.
4. Tap the “Connect” button (iPhone) or click “Connect” (Mac) to establish a secure VPN connection.
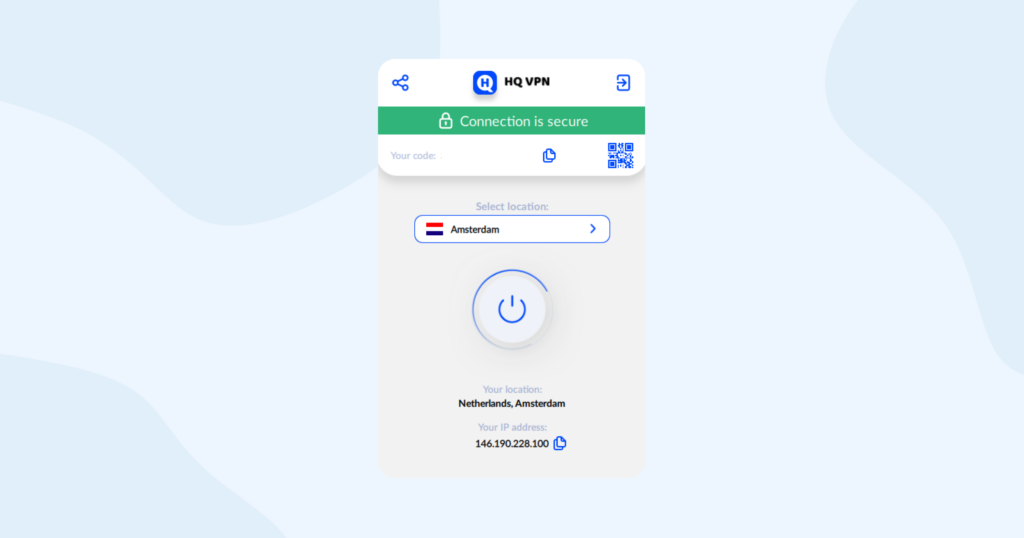
Your internet traffic will now be encrypted and routed through the VPN server, hiding your IP address from websites and services.
Each method offers a degree of protection to hide your IP address on your iPhone and Mac. Safari’s “Hide IP Address” option and iCloud Private Relay are convenient built-in features, while the Mail Privacy Protection feature enhances email privacy. For broader protection, using a reputable proxy server or a VPN might be the best option.
Carefully consider your needs and preferences to select the most suitable method to safeguard your online privacy effectively. Remember, combining multiple methods can provide even stronger protection.
How to find your IP address on your iPhone
The easiest way to learn you current IP address is to use this free online IP checker.
Simply tap the link and it will take you to a web page with all the necessary information such as your location (or the location of the server you’re currently connected to via VPN), your operating system, type of browser you are using, and your internet service provider (ISP).
It’s a helpful and friendly tool to quickly learn about your device’s internet identity.


