

How to Install HQ VPN: an Ultimate Setup Guide

Ready to bring your online safety to a new level? You are at the right place. Follow this step-by-step guide and learn how to install HQ VPN on any device in minutes.
We made this tutorial very user-friendly and easy to follow for anyone. Just grab your subscription from here, make sure your internet is on, and let’s get started!
Windows
Ready to install HQ VPN on Windows? Here’s what you need to do.
Download the HQ VPN app
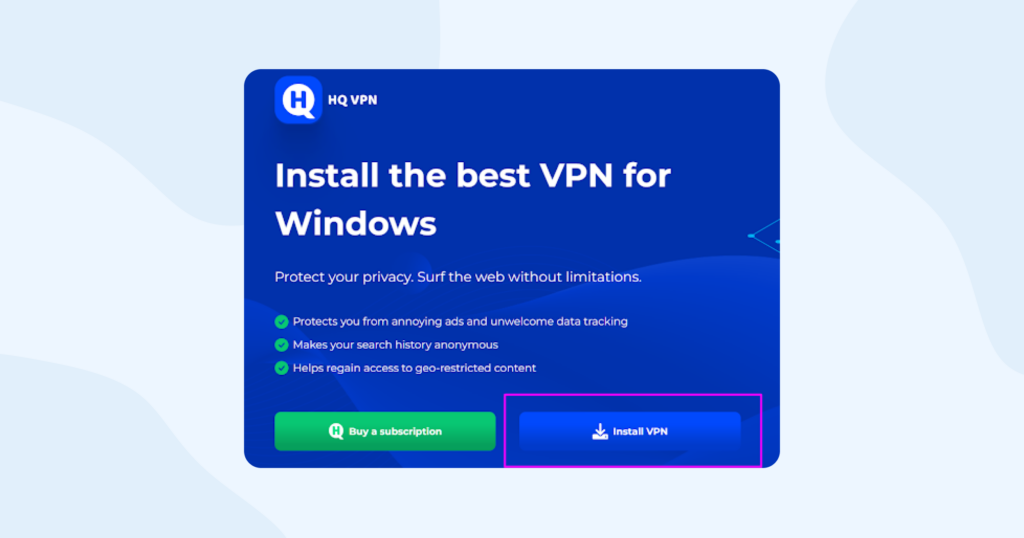
First things first, click here to download and install the latest version of the HQ VPN client for Windows.
Install the app
Once the downloading is finished, click open the file in the download bar of your browser…
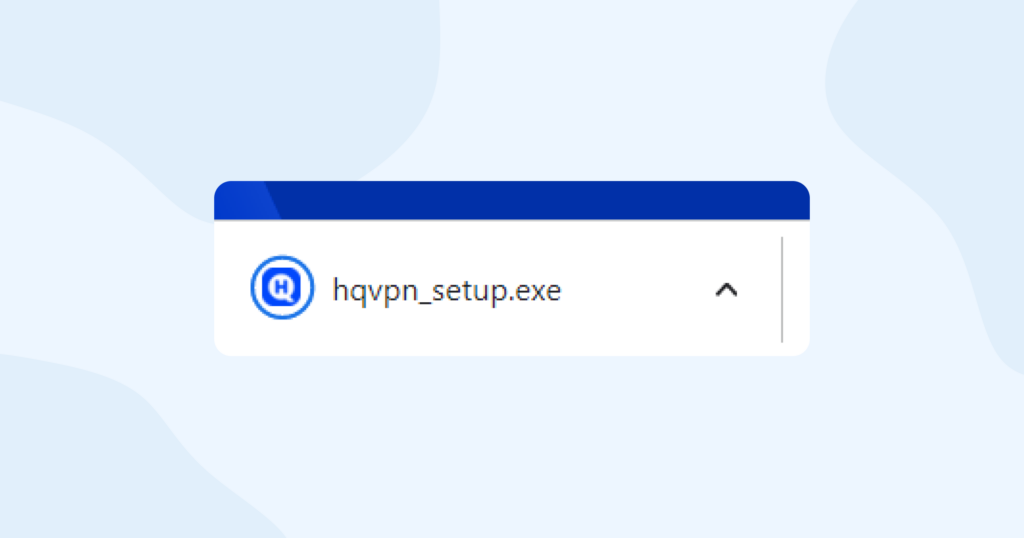
… or look for the “hqvpn_setup.exe” file in the download folder on your computer.
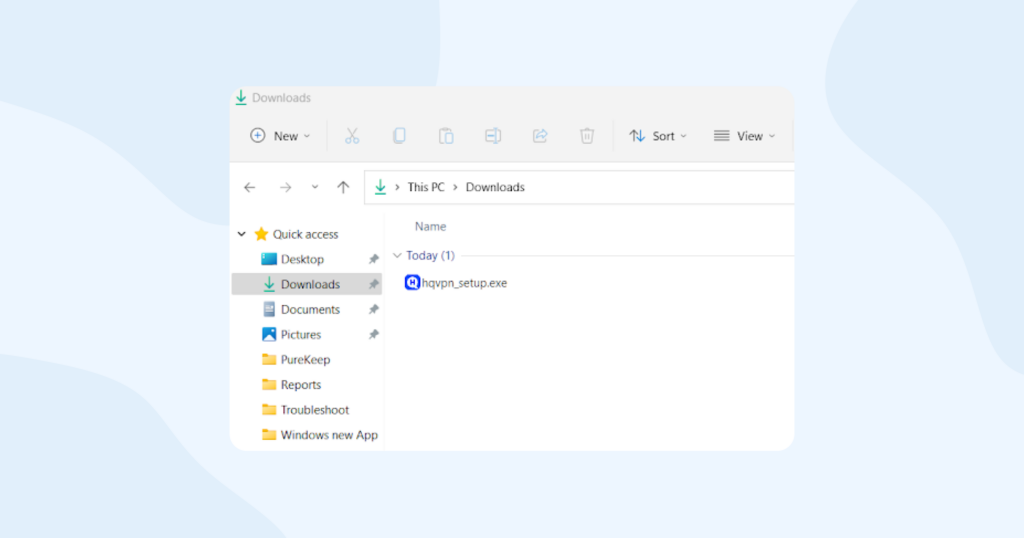
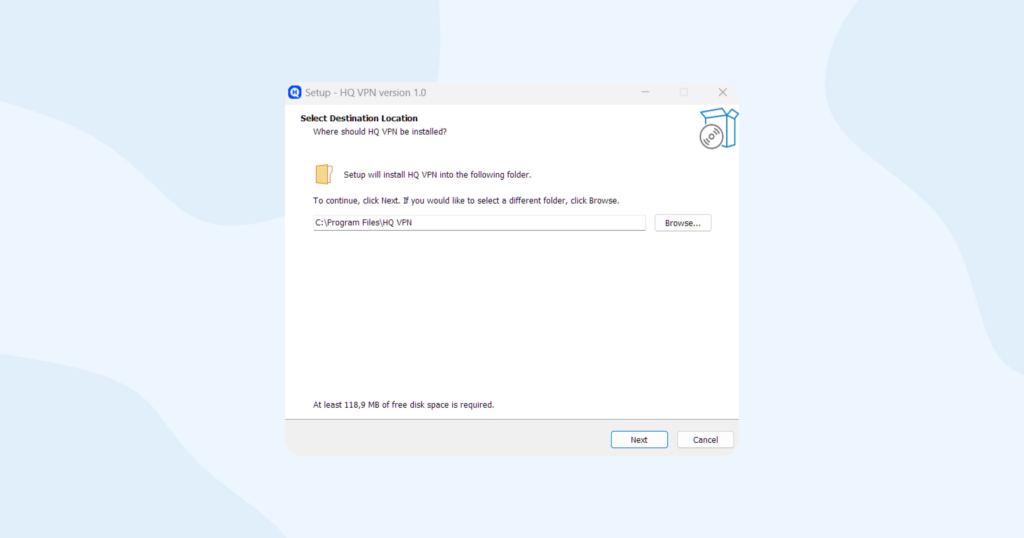
Double-click the “hqvpn_setup.exe” file.
If the system asks if you want to allow this app to make changes to your device, click “Yes” to proceed with the installation.
Enter the activation code
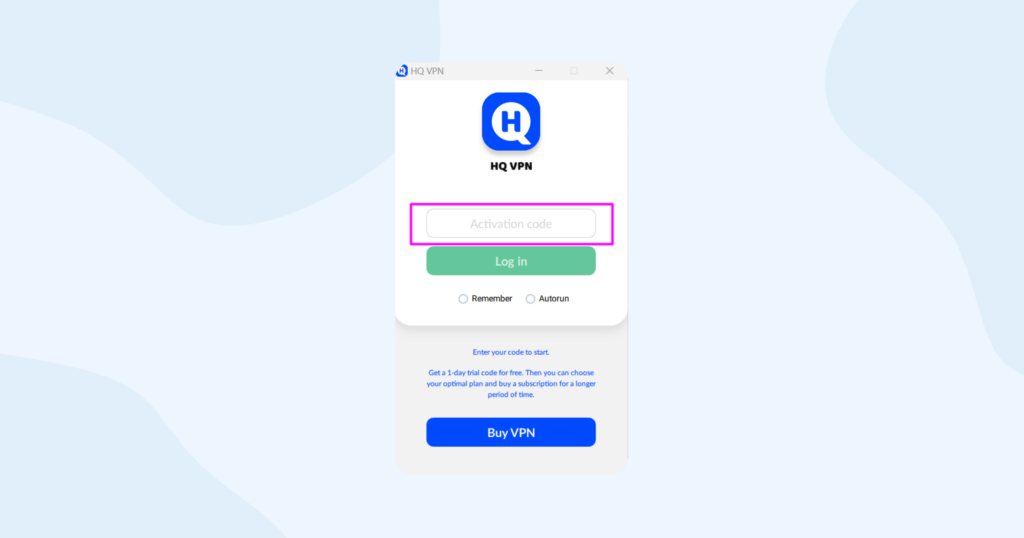
Once you have the HQ VPN app installed on your computer, you’ll need to log in. To do so, just enter or paste your activation code into the corresponding field.
If you don’t have an activation code, click this link to get your HQ VPN subscription. Once you subscribe, we’ll send you your activation code via email.
Choose a server
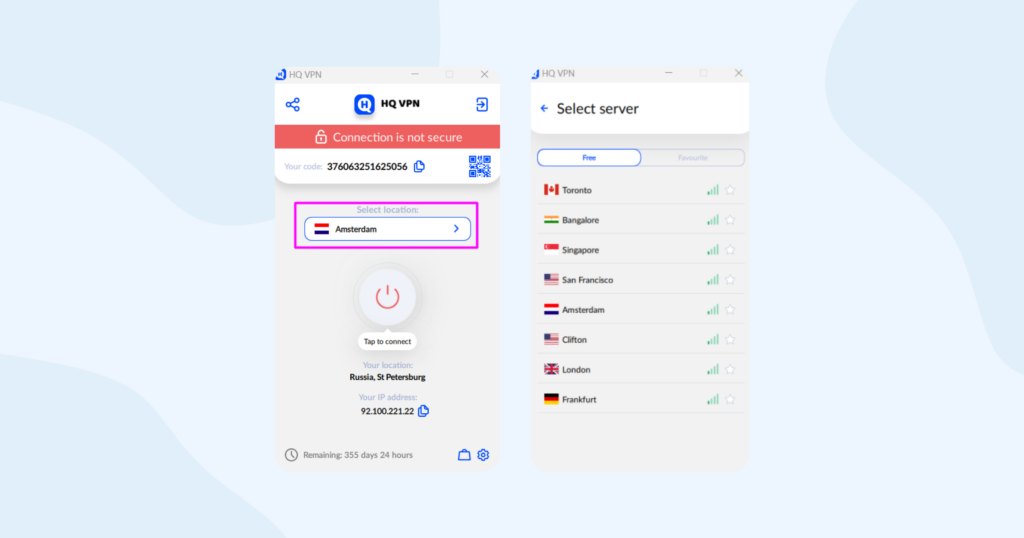
At this point, you are basically all set and ready to go online. Choose a location of your liking or go with our automatically selected server.
Connect
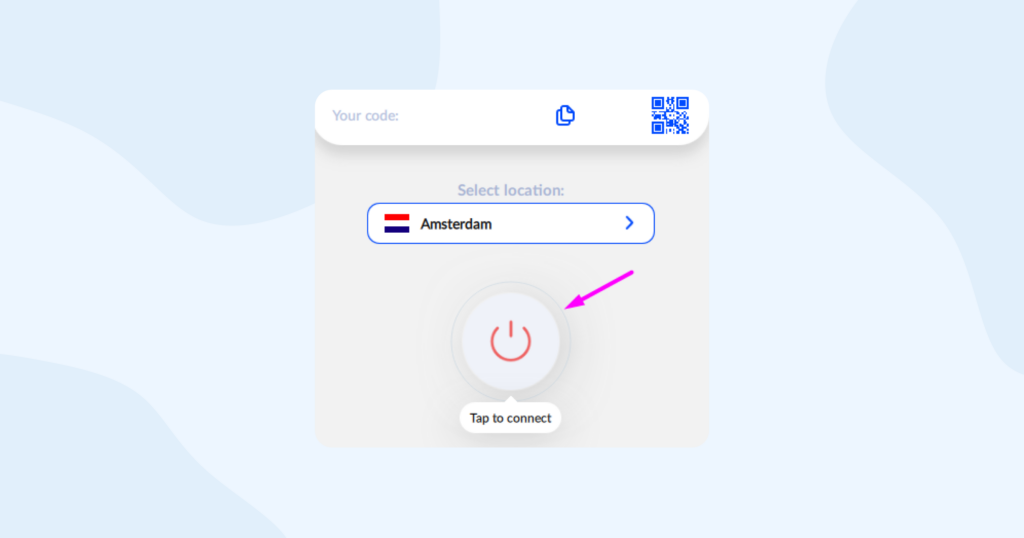
Tap the round grey button to turn the VPN protection on.
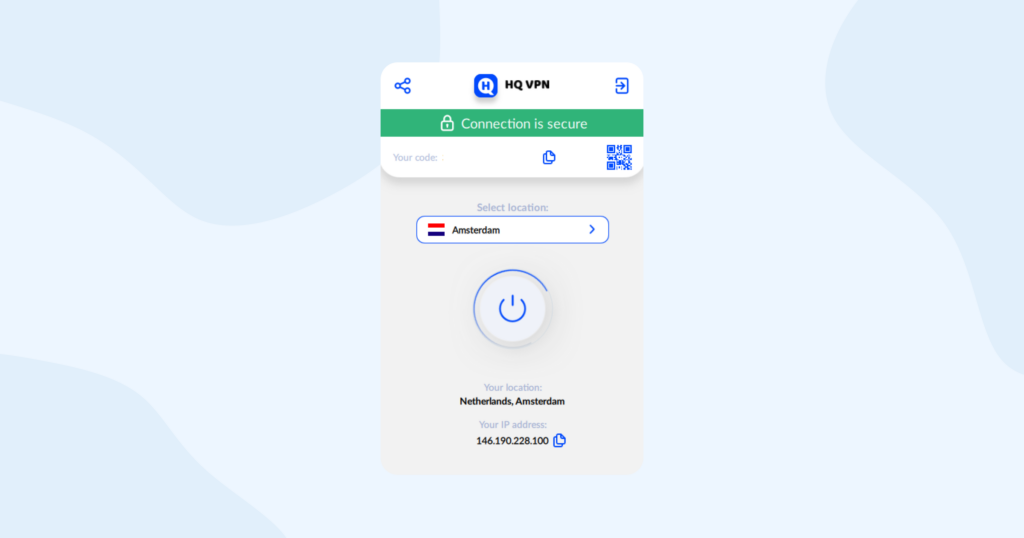
When the connection is on, the screen of your HQ VPN app should look like this:
MacOS
Installing HQ VPN app on a macOS device is a super easy task. Here’s what you need to do.
Download the HQ VPN app
Use this link to download the app for your macOS device.
Once the download is complete, open the downloaded file and follow the installation wizard.
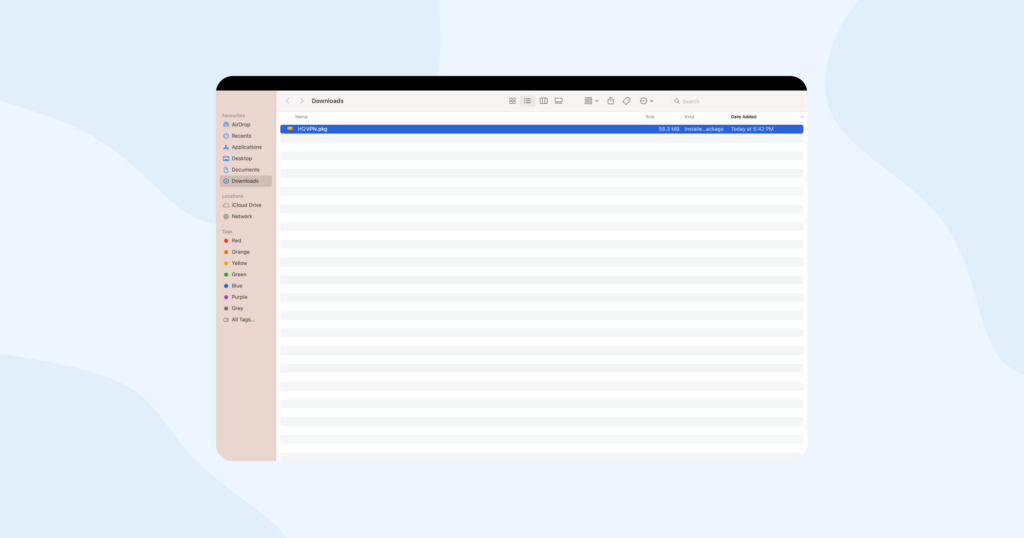
Install the app
The installation wizard will guide you through the installation process. Follow the on-screen instructions to complete the installation of HQ VPN on your macOS device.
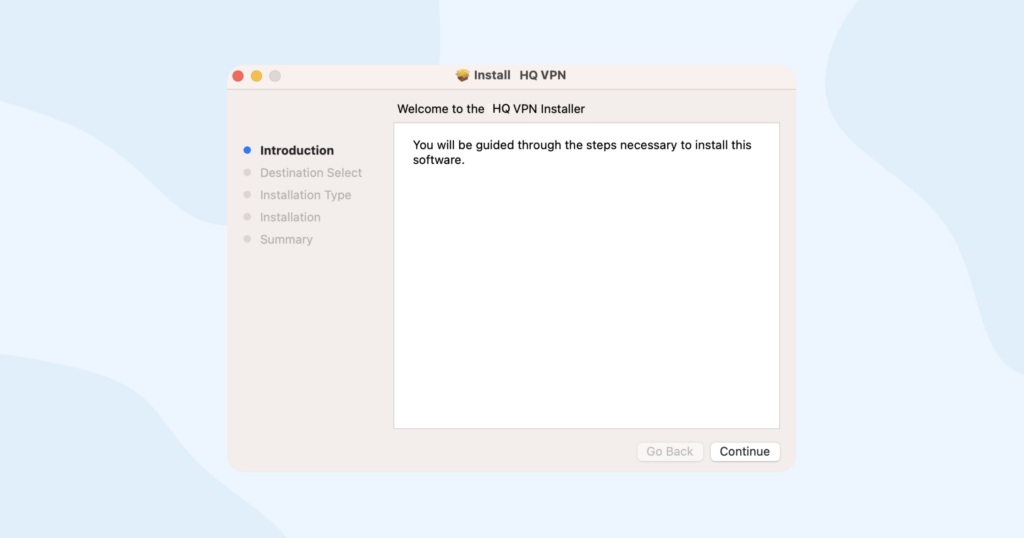
After the installation is complete, launch the HQ VPN app from your Applications folder.
Log in
Use your authorization code to log in to the HQ VPN app. If you don’t have one, grab your subscription here.
Connect to a server
Once you’re logged in, select the server location you want to connect to and click on the “Connect” button.
Congratulations! You’ve successfully installed HQ VPN on your MacOS device.
Remember, you can disconnect from the VPN by clicking on the “Disconnect” button in the HQ VPN app whenever you want to go back to your regular internet connection.
iOS
Learn how to install HQ VPN on your iPhone or iPad in just a few easy steps! Let’s get started!
Download and install the HQ VPN app
First, locate the App Store app on your device and tap the icon. It should look somewhat like this:

Once you’ve opened the App Store app, use the search bar to type in the name of our VPN service — HQ VPN, and start the search. Found it? Wait no more, tap “Download”!
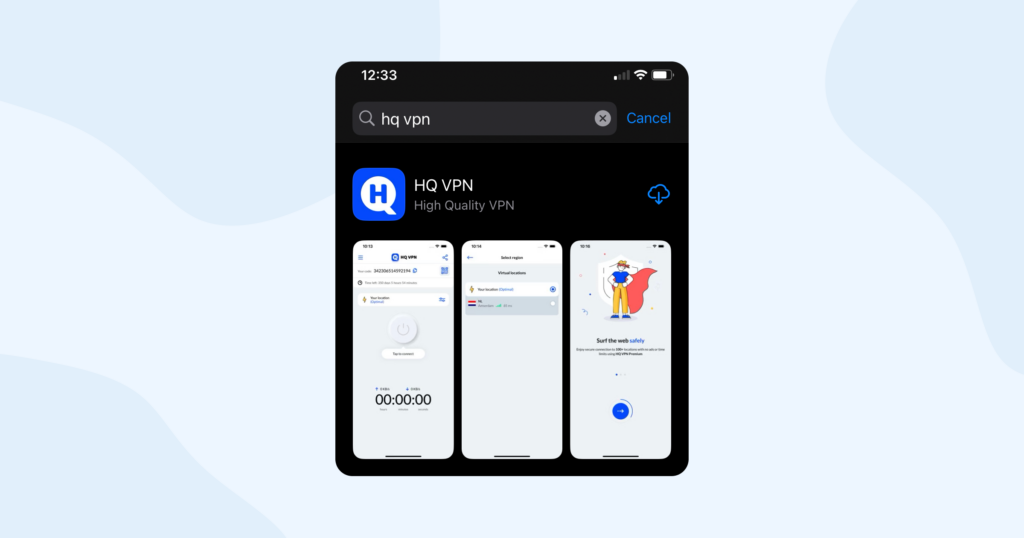
Open the app
Just tap the right icon. You sure know what to do;) And well, that’s basically it for the installation process.
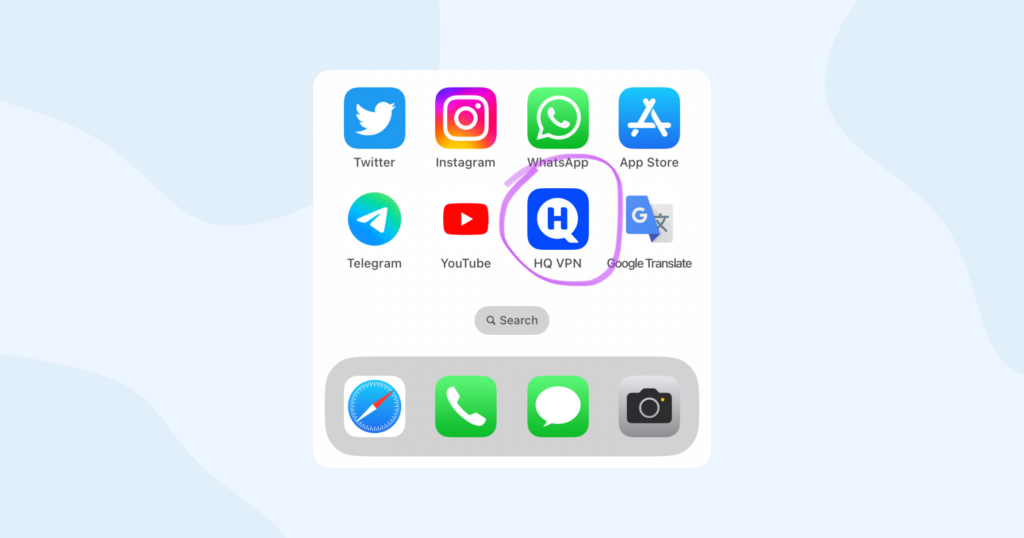
If you want to learn more about how to set everything up then read on, we’ve got all the steps covered here.
Select your language
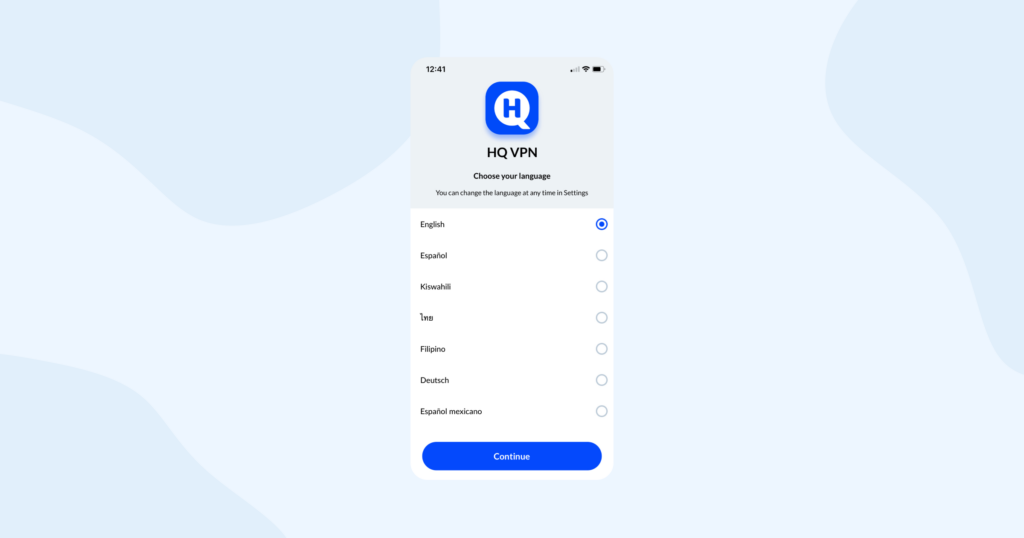
The first screen you see after you tap the HQ VPN app icon is language settings. We have localized our app for 14 languages. Make sure you scroll a bit to view all the language options available.
Log in
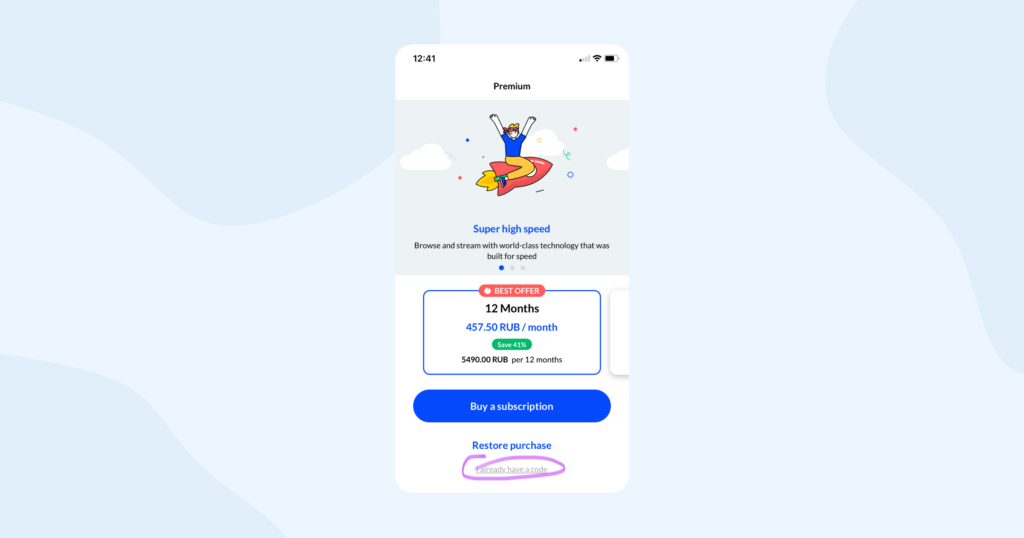
Make sure you have an HQ VPN subscription to proceed. If you do have a subscription, tap the line “I already have a code” marked on the screenshot.
Enter your authorization code
Type your email address and your authorization code into the corresponding fields and tap “Apply code”.
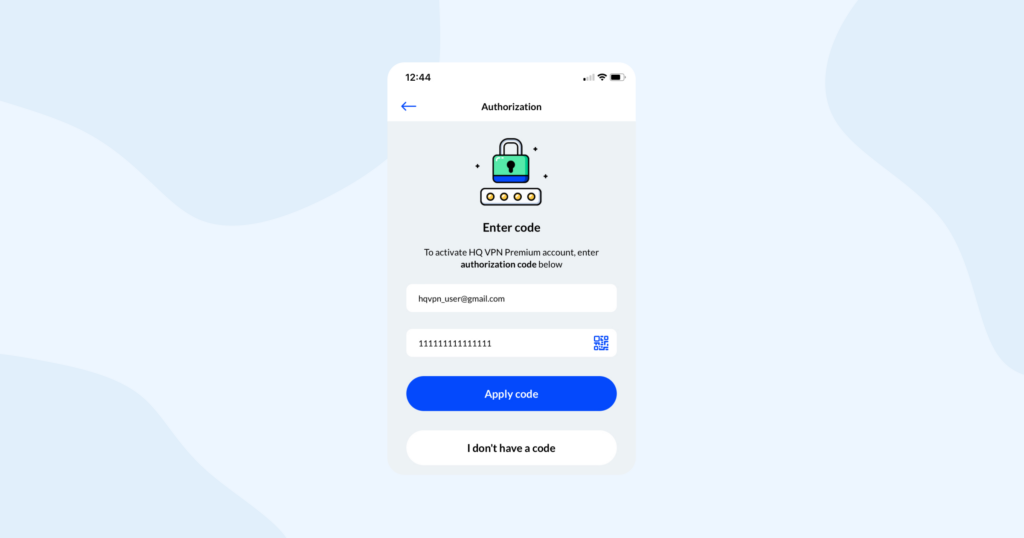
Important note: if you are using a shared authorization code, make sure you enter the email address of the person who initially shared this code with you.
Android
Want to install HQ VPN on your Android phone or tablet? Follow this step-by-step tutorial, easily install the HQ VPN app on your device and enjoy all the great features HQ VPN has to offer.
Download the app
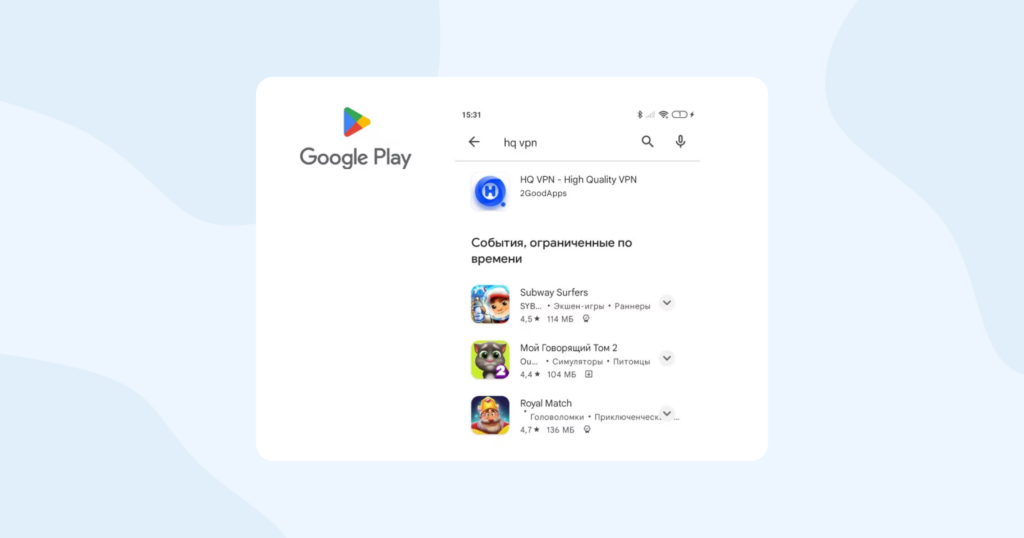
Open the Google Play Store on your Android device, tap on the search bar, and type “HQ VPN” into the search field. Then tap on the “Install” button to download and install the app. Wait for the download and installation process to complete.
Launch the app
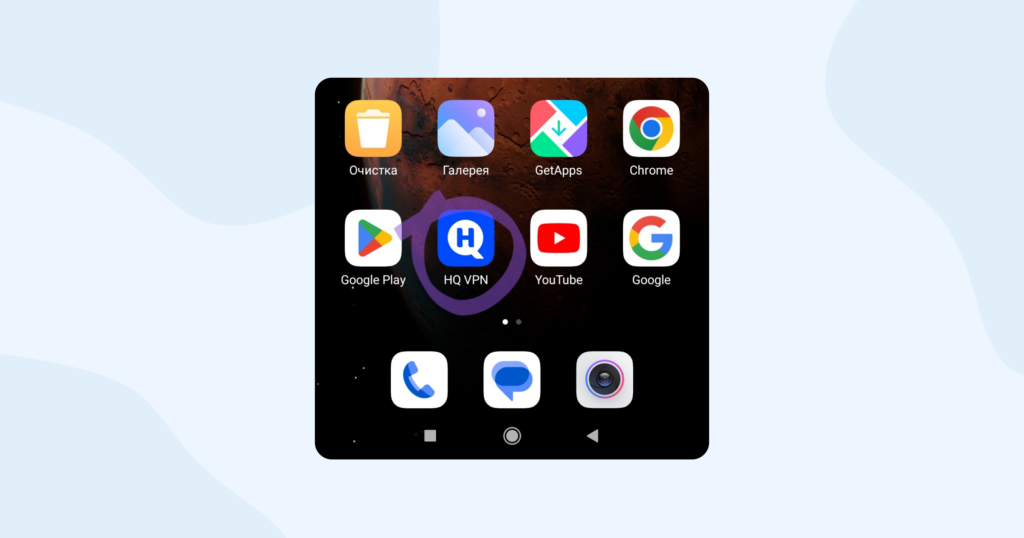
Once the app is installed, open it from your app drawer.
Select your language
The first screen you see after you tap the HQ VPN app icon is language settings. We have localized our app for 14 languages. Make sure you scroll a bit to view all the language options available.

Enter your authorization code
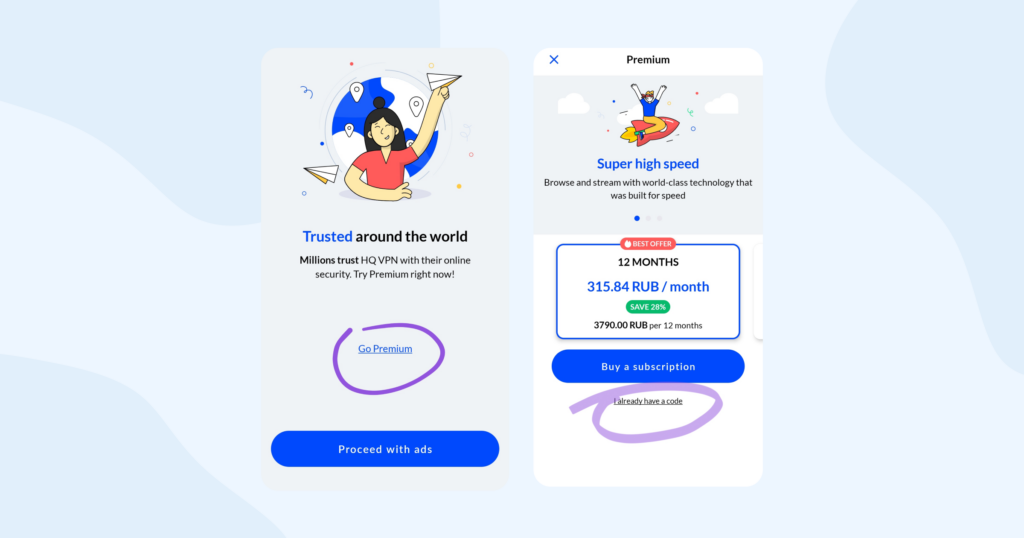
If you have an authorization code, tap “Go Premium” and tчhen tap the “I already have code” line.
Log in
Enter your authorization code to log in to your account.

Free version
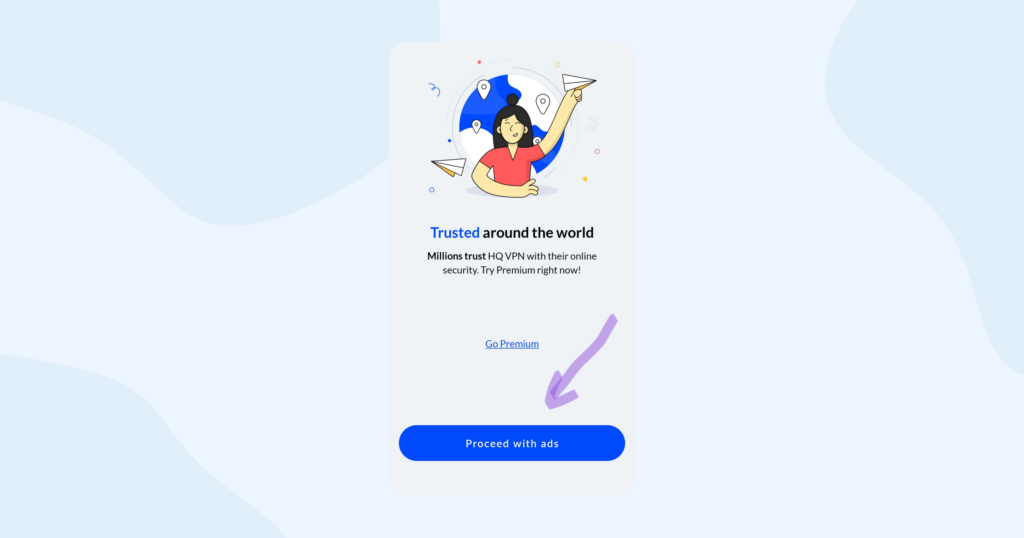
If you don’t have an authorization code and you want to use HQ VPN for free, tap “Proceed with ads”.
Select a server
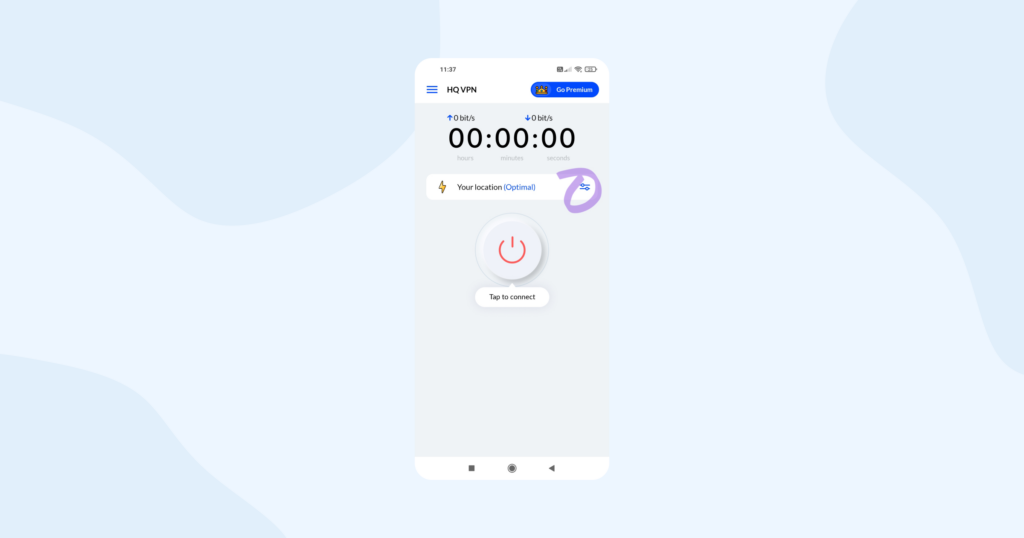
After logging in, select a server location you want to connect to from the list.
Connect
Tap on the “Connect” button to connect to the selected server.
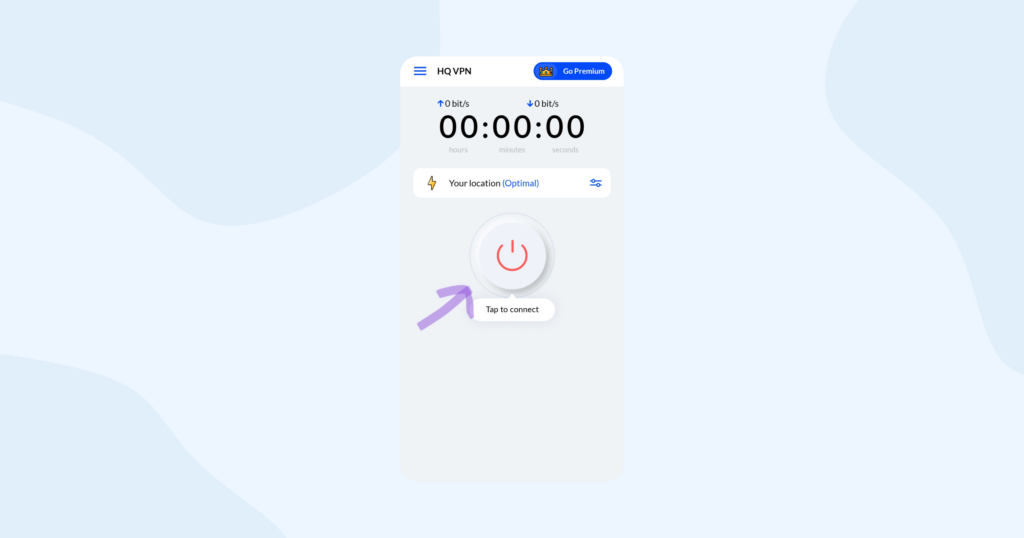
That’s it! You’ve successfully installed and connected to the HQ VPN app on your Android device. Now you can browse the internet securely and privately from your device.
Chrome
The HQ VPN browser extension is a quick and simple way to connect your web browser, whether you’re using Chrome, Firefox, or Edge, to a proxy server. Just turn it on and you’re good to go!
But keep in mind that the extension only secures your web browser and not the rest of your device. This means other apps, games, and tools may still use an unsecured internet connection. To protect them, you’ll need to download and install the HQ VPN app. Don’t worry, it’s easy! Just click on this link to start enjoying HQ VPN’s full protection.
So, how do you install an HQ VPN extension for your Chrome browser? Well, you need to download it first. Let us guide you through the process step-by-step.
Download the HQ VPN extension
To download the HQ VPN extension use this link. Or, if you are feeling adventurous, head to the Chrome Web Store and type HQ VPN into the search bar.
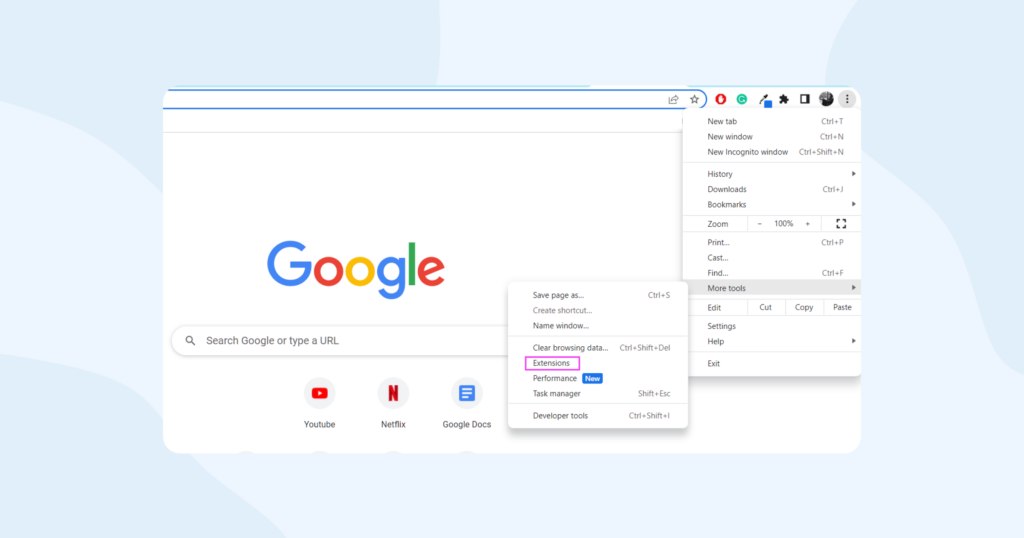
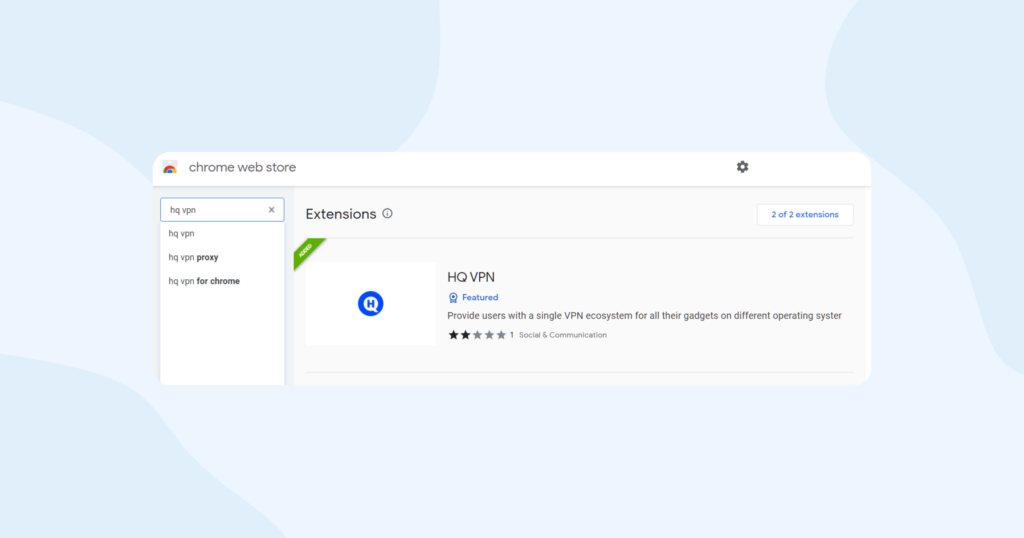
Install the HQ VPN extension
Open the HQ VPN extension page and click “Add to Chrome”.
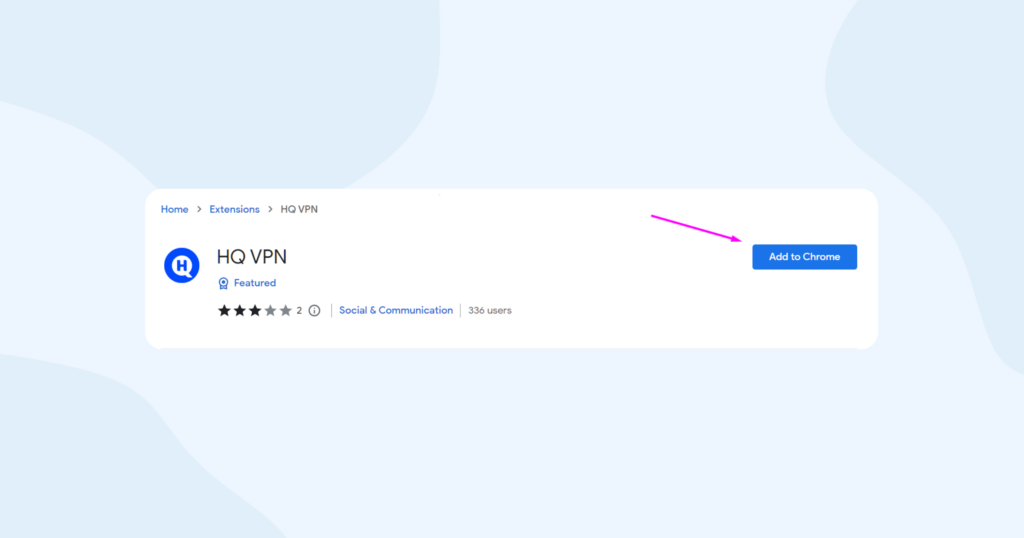
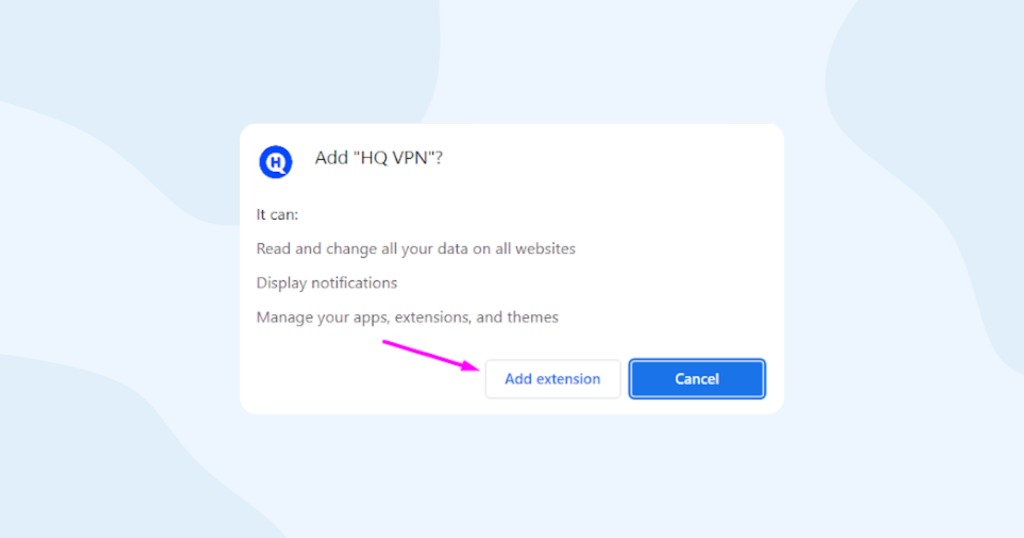
Confirm your choice by clicking “Add extension”.
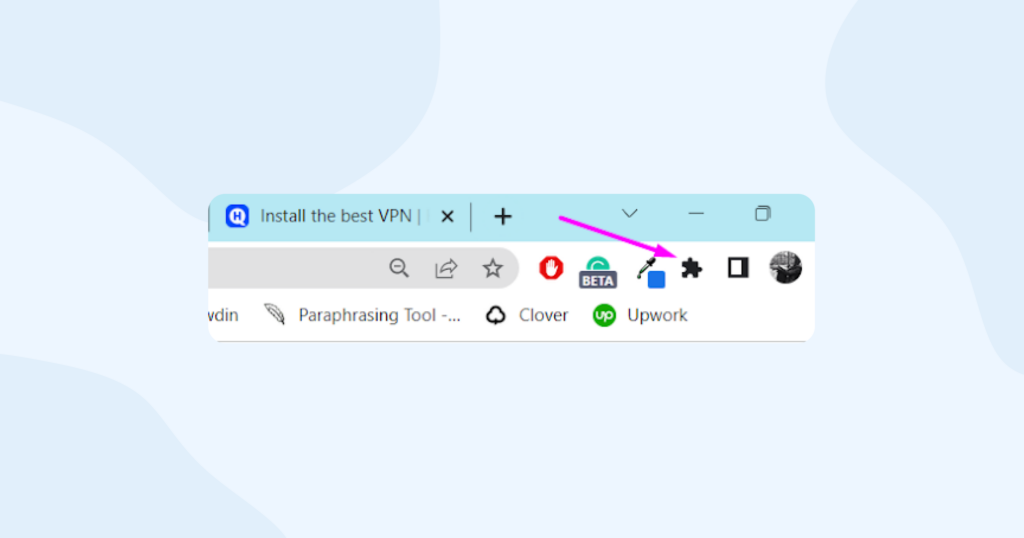
HQ VPN extension interface will become available in your extensions list. Just click on the puzzle piece icon in the top right corner of your browser window.
Launch the HQ VPN extension
Find the HQ VPN extension icon in your extensions list and click it.
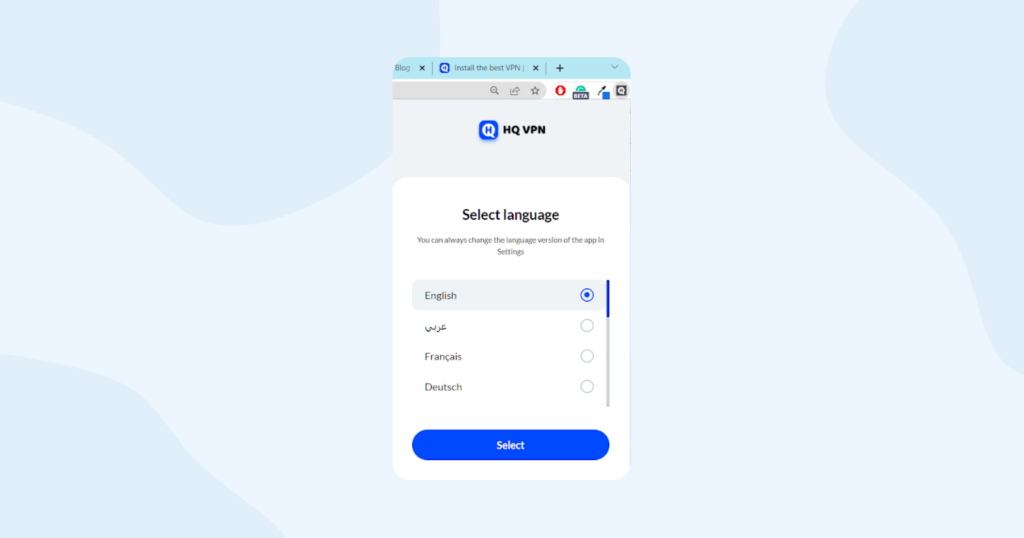
Select your language
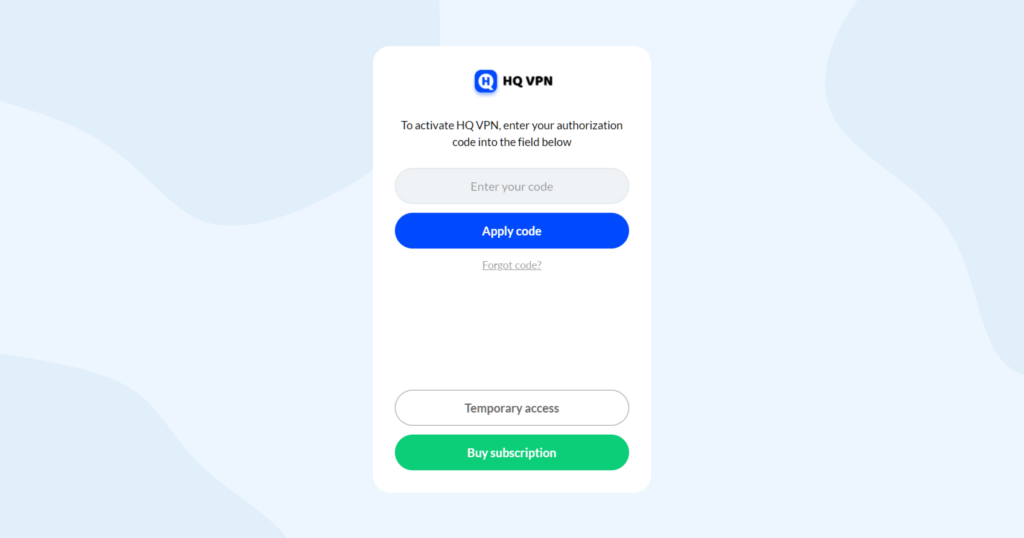
Enter or paste your authorization code. If you don’t have one, get your HQ VPN subscription here and we’ll send you your authorization code via email.
You can also get 1-day temporary access to give our service a try. Just click the “Temporary access” button.
Connect
Now tap the round grey button in the center of the screen to connect. Choose a location of your liking or go with our automatically selected server.
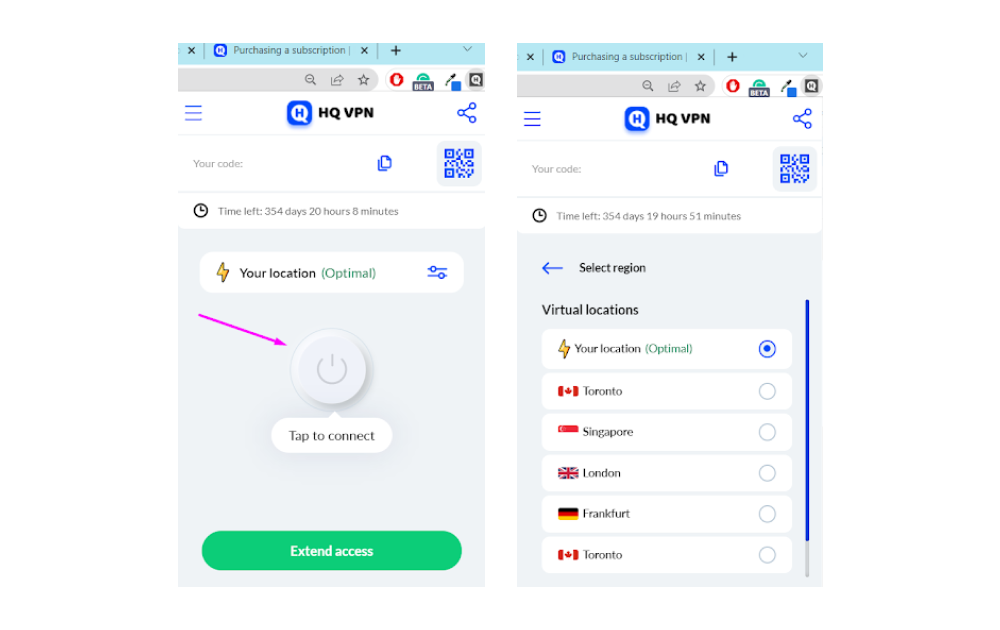
Add to favourites
Pin HQ VPN extension for quicker access. Find the HQ VPN extension in your extensions list and click the pin icon.

Firefox
Looking for a quick and simple way to connect your web browser to a proxy server? Look no further than the HQ VPN browser extension! Now follow these simple steps to install the HQ VPN extension on your Firefox browser.
However, keep in mind that the extension only secures your web browser and not the rest of your device. To protect all your apps and tools, download and install the HQ VPN app with just a click of a link.
Download the HQ VPN extension
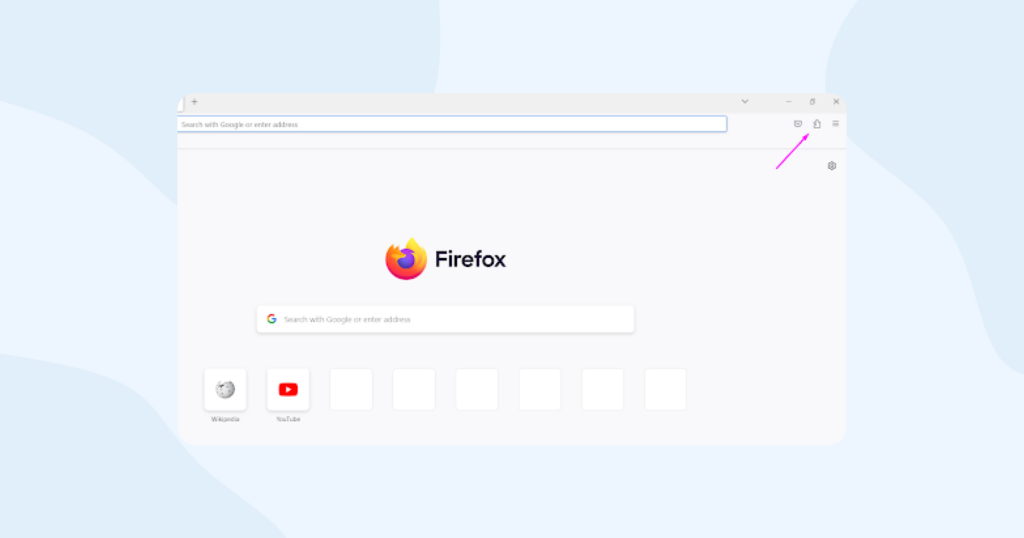
Open the Firefox browser on your device. Navigate to the Firefox Add-ons website by typing “addons.mozilla.org” in the address bar and pressing enter. Or just click the puzzle piece icon at the top-right corner of the Firefox browser window.
In the search bar, type “HQ VPN” and hit enter. From the search results, click and open the HQ VPN extension page.
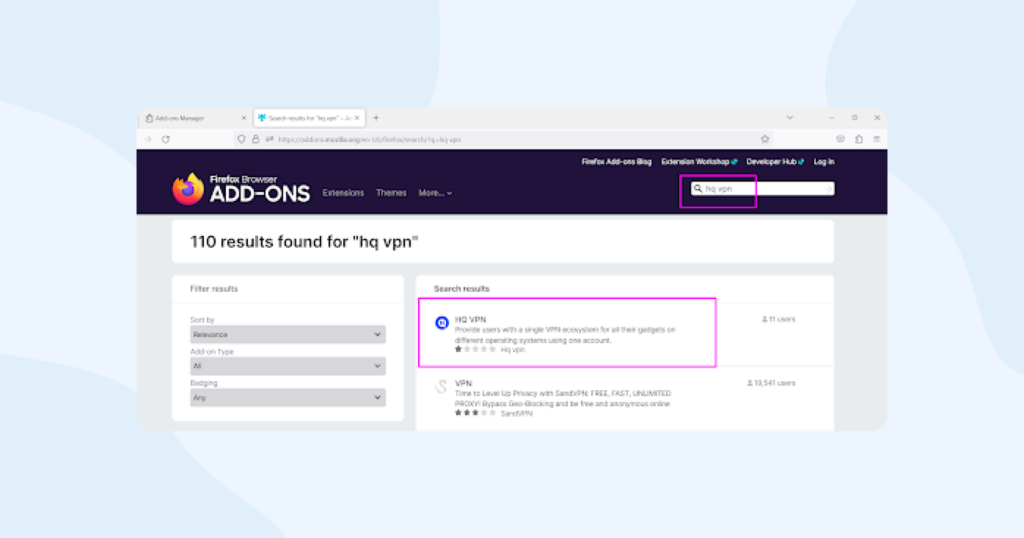
Install the HQ VPN extension
Click on the “Add to Firefox” button located on the right-hand side of the page.
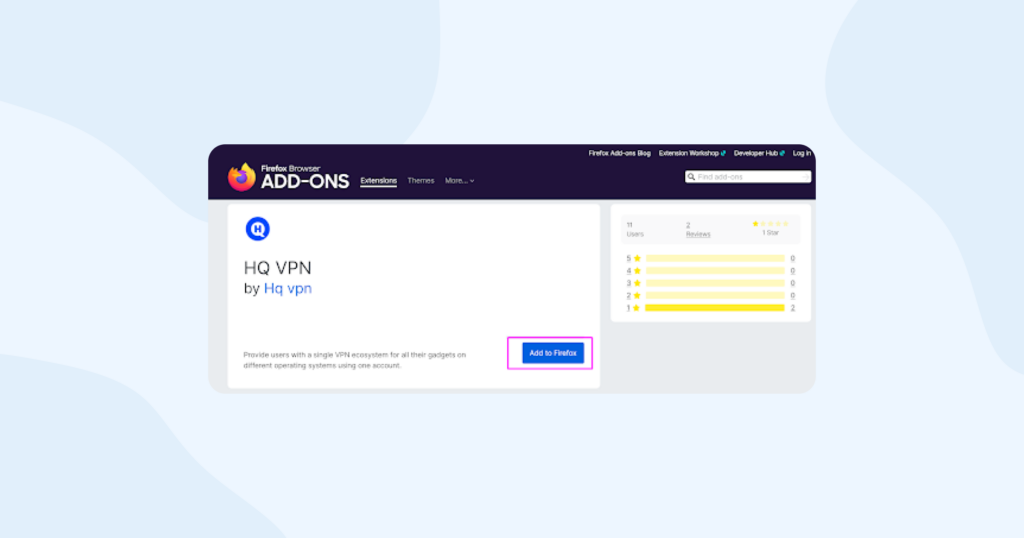
You will see a pop-up window that says “Add HQ VPN?” Click “Add”.
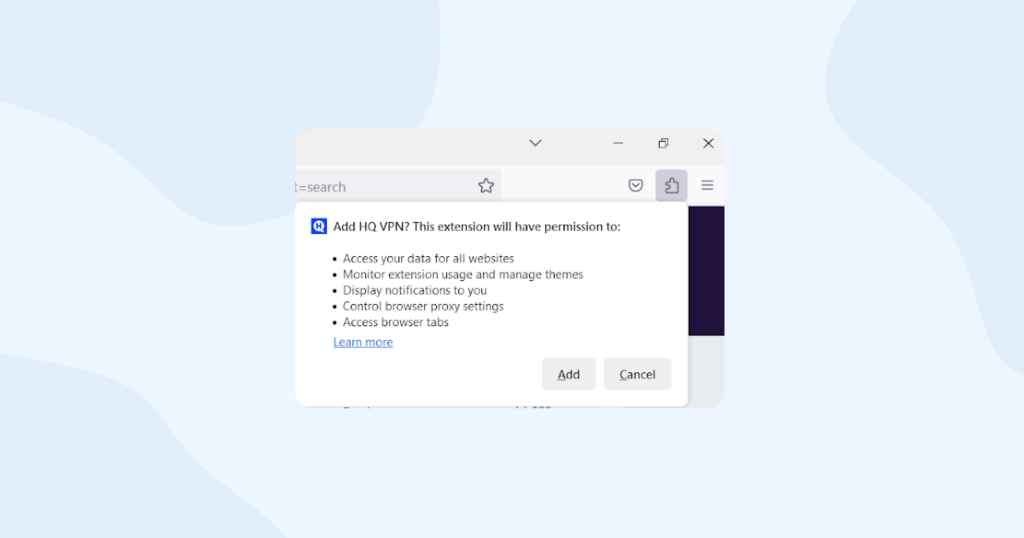
Once the installation is complete, you will see a notification that says “HQ VPN has been added to Firefox”.
Launch HQ VPN
To activate the HQ VPN extension, click on the puzzle icon located at the top-right corner of the Firefox browser window.
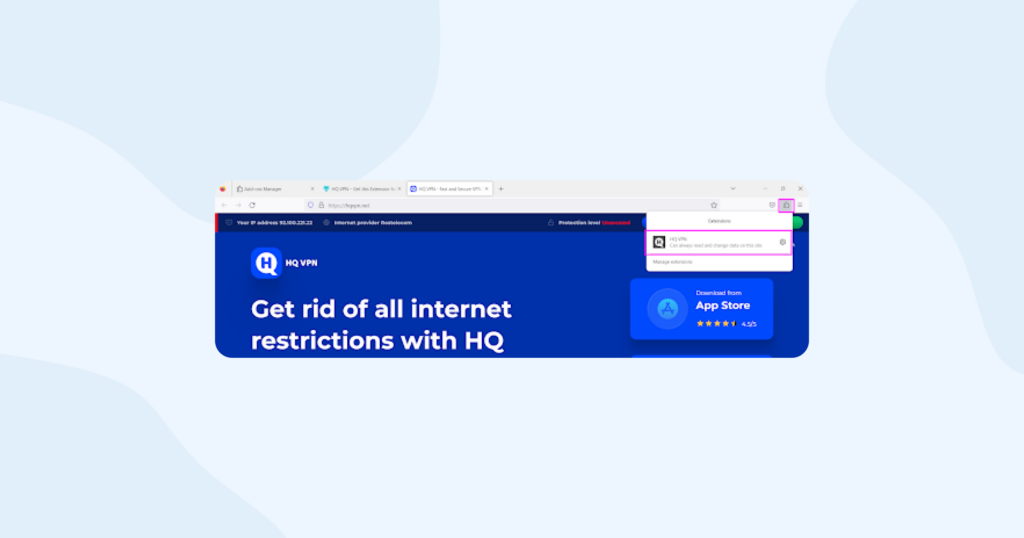
Find the HQ VPN extension icon in your extensions list and click it.
Select your language

Log in
Enter or paste your authorization code. If you don’t have one, get your HQ VPN subscription here and we’ll send you your authorization code via email.
You can also get 1-day temporary access to give our service a try. Just click the “Temporary access” button.

Now click the round grey button in the center of the screen to connect. Choose a location of your liking or go with our automatically selected server.

And that’s it! You’ve successfully installed HQ VPN extension on your Firefox browser. Now you can browse the web with added privacy and security.
Edge
Download the HQ VPN extension
To install the HQ VPN extension on your Edge browser, use this link. It will take you to the Chrome Web Store and that’s okay, just click “Allow extensions from other stores”.
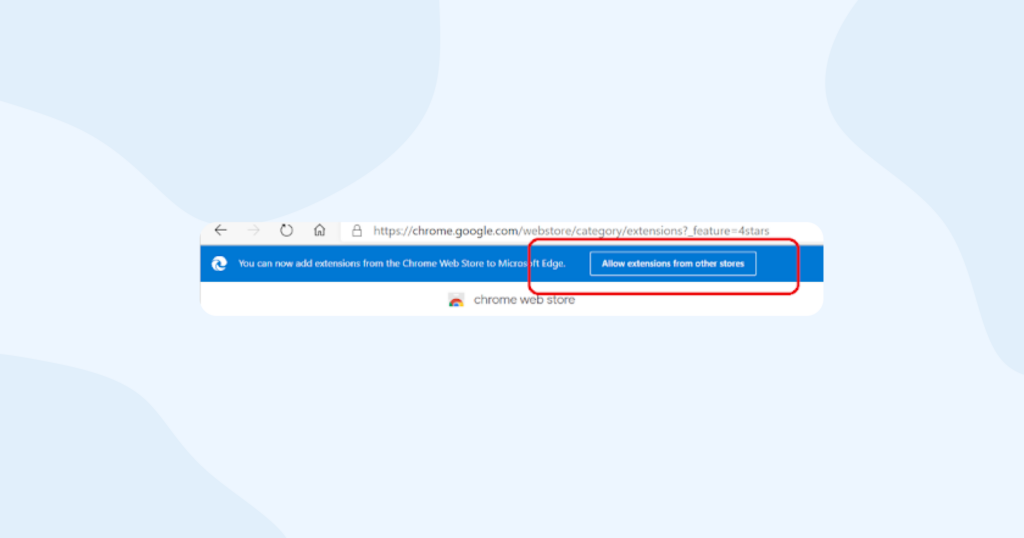
Install the HQ VPN extension
Click “Install” and confirm your decision by clicking “Add extension”.
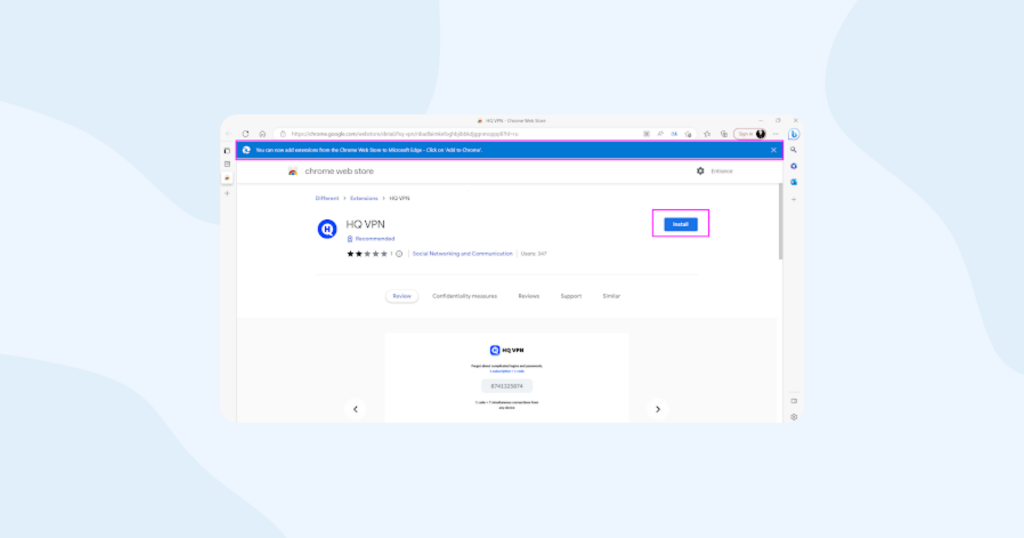
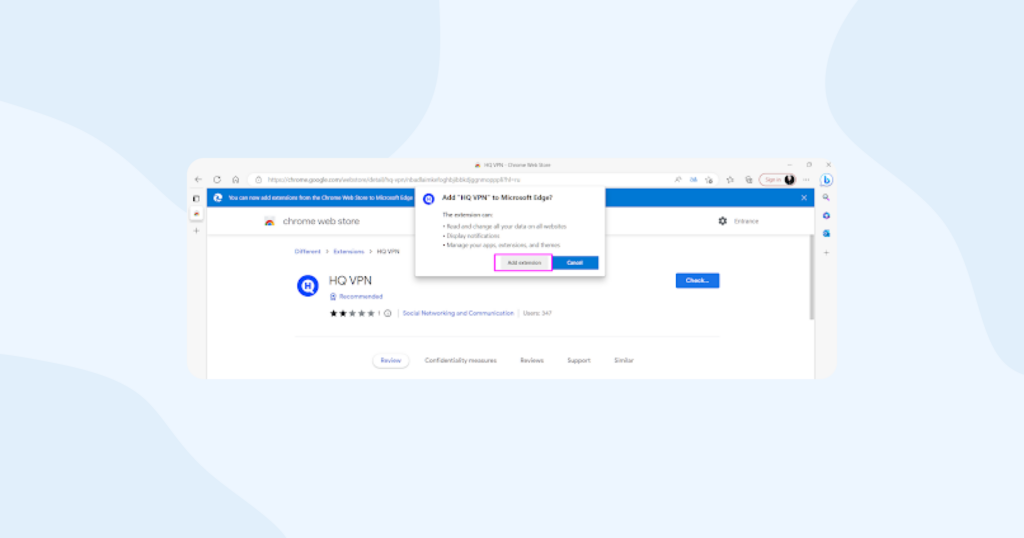
You’ll recieve a notification confirming that HQ VPN browser extension was added to your Microsoft Edge browser.
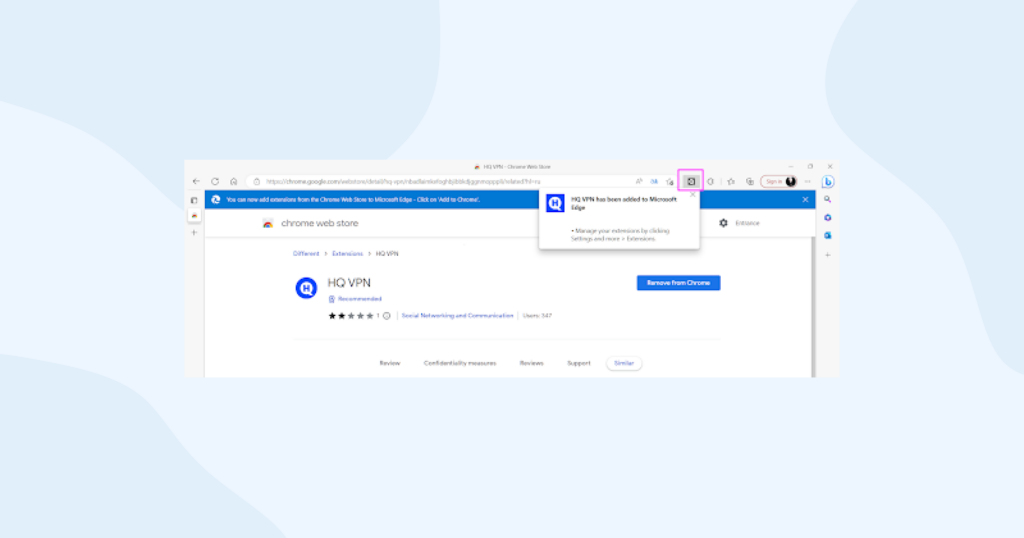
Select language
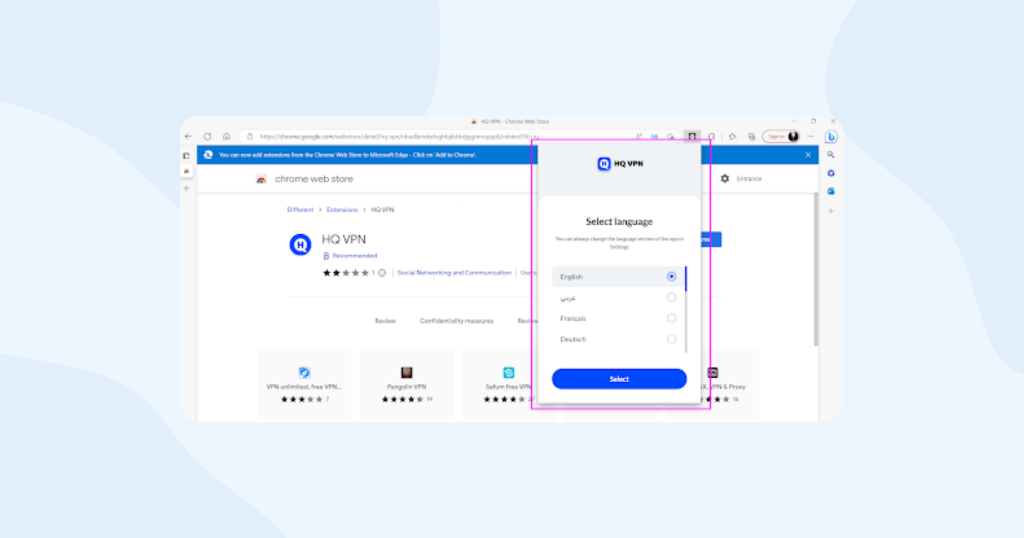
Click on the HQ VPN extension icon and select your preferred interface language.
Log in
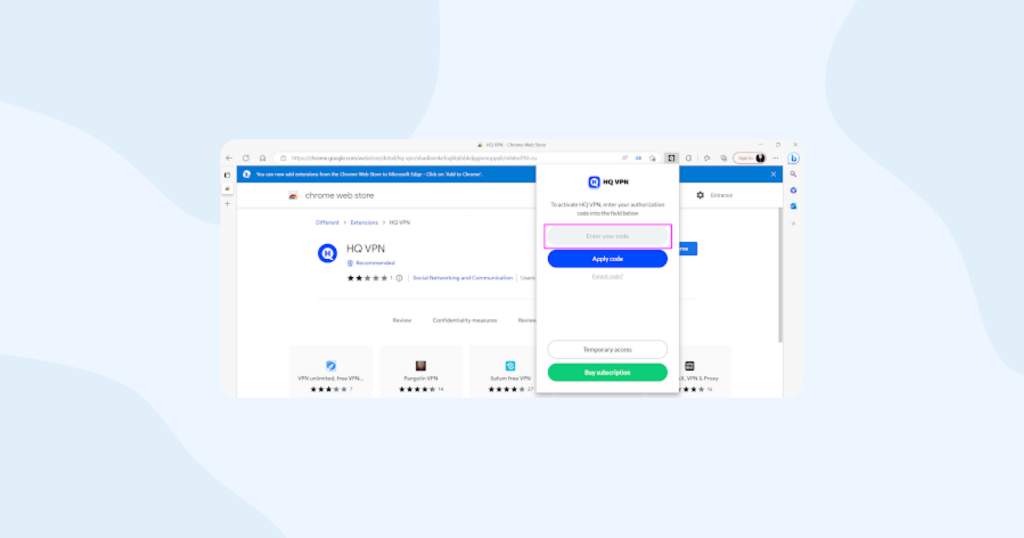
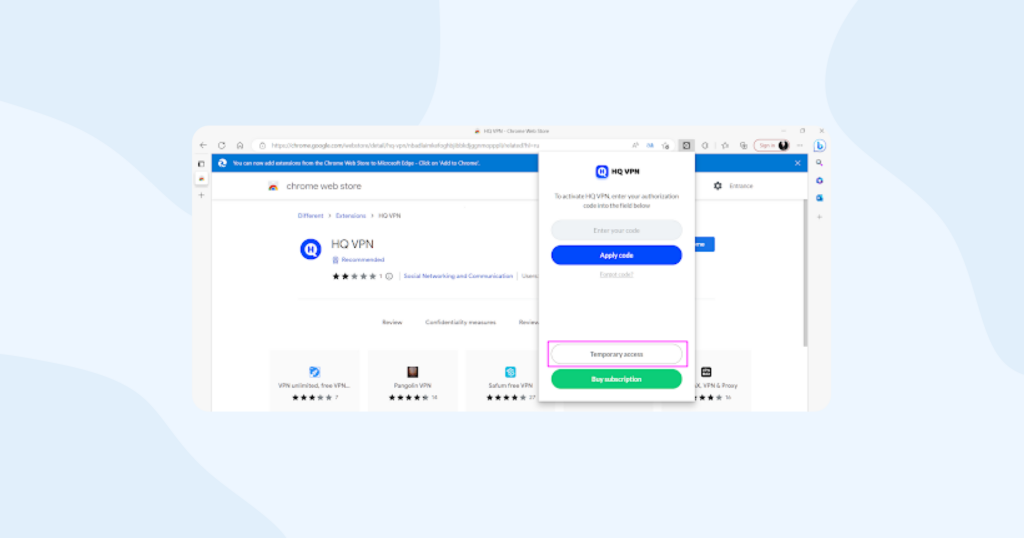
Enter your authorization code to log in into the app. If you don’t have one, get your HQ VPN subscription here and we’ll send you your authorization code via email.
You can also get 1-day temporary access to give our service a try. Just click “Temporary access” button.
Connect
Once you’re in, click the round grey button in the center of the screen to connect to a server. Choose a location of your liking or go with our automatically selected server.

And that’s it! You’ve successfully installed HQ VPN extension on your Edge browser. Now you can browse the web with added privacy and security.


